Pepperoni is always delicious, but especially so when you make your own. We’re showing you how to make pepperoni at home, with or without special sausage-making equipment.
Today, we’re applying the same technique we used for kielbasa to making pepperoni. We’re giving instructions for making pepperoni without using any special equipment, like a meat grinder or sausage-stuffer. We also have instructions for if you have a sausage-stuffer, but usually you should follow the instructions that come with you machine.
Pepperoni is traditionally smoked. That results in the casing having a smoky flavor. We’re not smoking this sausage though. Instead, we’re baking it in the oven. If you’d like, you can add a drop of liquid smoke to the meat mixture. It is a very potent ingredient though so be careful. Also, be sure to do as instructed in the recipe and add the liquid smoke to the other liquid and stir it up so that it disperses well into the meat and doesn’t end up too concentrated in one spot.
For your info, I actually don’t put the liquid smoke in my pepperoni when I make it. I find it too overpowering, and I don’t like it flavoring all the meat like that. But some people really like it in there, so I will leave that up to you!

The Meats To Use For Pepperoni
You’ll see that we call for two types of ground meat in this recipe: Pork and beef. There’s good reason for that.
The ground pork gives lots of juiciness and also the smooth texture to the sausage. The ground beef is a bit leaner and has a deeper flavor.
If you want larger chunks of fat in your pepperoni (the white flecks that you sometimes see in there), you can use some chopped uncooked bacon or pork fat back.
What Do You Add To The Meat For Pepperoni
To the mixture of meats, you’ll be adding Pepperoni Seasoning. This is a blend of spices and salt that gives the sausage a distinctive pepperoni flavor.
First though, you’re adding another mixture. This is cure that has been dissolved in water. The powdered cure that you need to dissolve comes with the Pepperoni Seasoning that we recommend. Or you can buy it separately. However, every brand of cure and of seasoning is different. You’ll want to read the instructions on the packets to make sure that the amounts they recommend are similar to ours. If they’re different, use the amounts recommended on the packet.
You’ll add liquid smoke to the cure and water mixture as well, if you’re using that. Blending the cure and liquid smoke with the water allows it to disperse better throughout the meat.
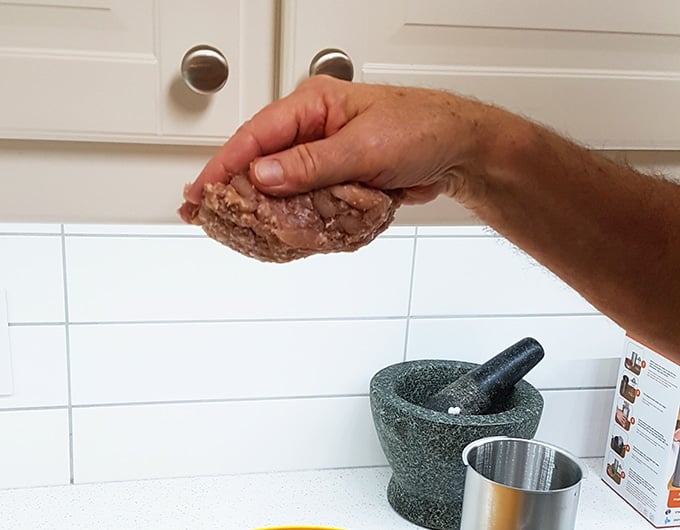
After you’ve mixed in the water-cure mixture and the pepperoni seasoning, keep mixing by hand and add water, 1 teaspoon at a time, until it is really sticky. Really sticky. If you take a handful of the meat mixture and squeeze it in your hand, then invert your hand, the meat should be sticky enough that it doesn’t fall off.

How To Shape/Stuff Pepperoni
We’re giving you instructions for two ways to make the pepperoni. One option involves no special equipment at all. The other involves the use of a sausage stuffer.
How To Make Pepperoni Without A Sausage Stuffer

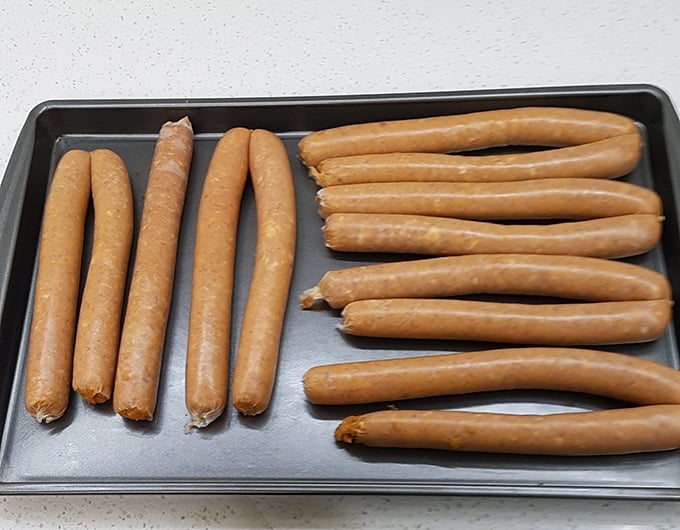
I’ll admit that this close-up picture of sausages without casings looks a bit odd, but truly, even without casings or a sausage-stufffer, they do end up looking like pepperoni, and, more importantly, they taste amazing!
To make pepperoni without a sausage stuffer, you’re going to follow the detailed instructions over here. To give you the idea though, what you’ll be doing is taking two pieces of plastic wrap and overlapping them. Then you scoop a handful of the meat mixture onto the plastic wrap. Shape the meat into a cylinder that is the length and diameter that you’d like your sausage to be. You don’t want to go thinner than about 1 and 1/2 inch diameter though if you want it to hold together well. Thicker is better. Think of the diameter of pepperoni that is used for slicing in sub sandwiches more than for snack sticks.
Wrap the meat in the plastic wrap, burrito style, by folding in the sides, and then rolling the meat to wrap it all up nice and tight.
Then, wrap that in aluminum foil. Repeat the plastic wrap and foil with all of your meat.
Put your wrapped meat into a single layer on a tray in the fridge. Let them sit there for 24 hours. The tight wrap and the cold will form your pepperoni in a way that keeps its shape. That stickiness that we talked about above is also helpful for this.
When you’re ready to cook the pepperoni, unwrap them from the foil and from the plastic. You’ll have nice sausage-shaped cylinders of meat that you can then cook following the instructions below.
How To Make Pepperoni With A Sausage Stuffer

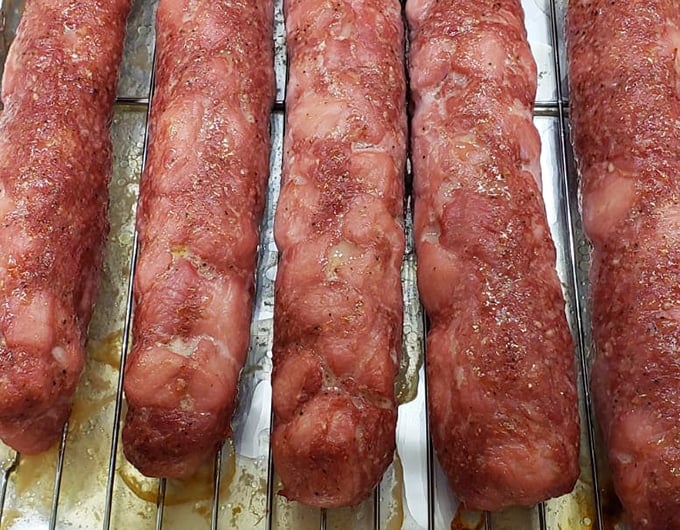
The above picture is what your pepperoni sticks will look like before you cook them.
Whether you have a Hand Crank Sausage Stuffer, or a KitchenAid Attachment, you should read the instructions that came with your equipment, and buy the casings that they recommend in terms of size and material. We use collagen casings, like these.
It’s a good idea to read the instructions on the casings that you get as well. If they don’t have instructions, read the reviews on Amazon. You’ll find out if you need to wet the casings first, and also good info about how to cook the pepperoni so that they don’t split.
As mentioned, you should read the instructions on your sausage-stuffing machine. But basically, you’ll be putting your meat mixture into the sausage stuffer meat compartment. Then you’ll put the casing on the tube that the meat comes out of. Finally, you’ll control the meat coming out using the hand crank or it will be done by the machine.
Your task is to control how much casing you’re feeding at a time to get an even thickness of sausage into the stuffing. Do not overstuff the sausages. This can lead to the casings splitting while you’re stuffing them, or even later when you try cooking them.
Be aware that feeding the meat into the casing takes some practice. You need to get a feel for how much meat passes through, and then you need to twist the casing (squeeze the meat through the casing to make a good indent, then twist the casing) so that you have individual sausages and not one long continuous sausage.
You will get the hang of it though. It just takes a little bit of practice. Be sure to take pictures of your first pepperonis coming out of the stuffer though. It’s an achievement, and you’ll be amazed at how much better you get at it.
After you’ve stuffed the pepperoni, arrange it in the refrigerator for 24 hours in a single layer. If you pile it, the top ones will squish the bottom ones. It’s important that the pepperoni goes in the fridge for 24 hours because that allows the cure to really penetrate and gives it a more even distribution. If you don’t let it sit in the fridge, you might end up with parts of your pepperoni that aren’t pink/red because the cure didn’t get to that part as well.
How To Cook Pepperoni

Whether you have sausage-shaped cylinders without casings (following from the “Without A Sausage Stuffer” section above) or sausage in casings, you’re going to proceed in the same way.
After your pepperonis have been in the fridge for 24 hours, heat the oven to 325F.
Arrange them in a single non-overlapping layer on an oven-safe rack set over a sheet pan. You keep the meat on the rack so that fat and liquid can drip down off the pepperoni and onto the pan. In that way, they aren’t sitting in the liquid. Also, this allows for the air to circulate all around the pepperoni, which leads to more even cooking.
Bake the pepperoni until an instant-read thermometer reads that the middle of the sausage has reached 160F. This will take 45-60 minutes.
Then you simply take it out of the oven, let it cool, and dig in!
Using A Homemade Pepperoni Seasoning Blend
The recipe below calls for this pepperoni seasoning blend that you mixed together. It also comes with a packet of cure. If, however, you’d like to use your own homemade seasoning blend, that’s easy to do. Pepperoni typically contains sweet paprika, black pepper, fennel or anise, mustard powder, allspice, cinnamon, and cayenne or crushed red pepper flakes. You can mix up your own blend of those spices, or use my pepperoni seasoning recipe from here. The only thing you then need to do is get some cure. This is the cure that I recommend.
As for amounts, for the 5 pounds of ground meat in the recipe below, you’ll use the full recipe of pepperoni seasoning, which is equivalent to about 1/2 cup or 4 ounces of seasoning. You will then add 8 grams, or about 1 and 1/2 teaspoons of the cure, and 3 teaspoons of sugar. Other than that, the recipe is the same.
Podcast Episode About Making Homemade Pepperoni
Listen to our editor, Christine Pittman, explain briefly about how to make this recipe, with some great tips along the way, by clicking the play button below:
Listen to more Recipe of the Day episodes here.
Print
Homemade Pepperoni
Pepperoni is always delicious, but especially so when you make your own. We’re showing you how to make pepperoni at home, with or without special sausage-making equipment.
- Prep Time: 30 minutes
- Chill Time: 24 hours
- Cook Time: 1 hour
- Total Time: 25 hours 30 minutes
- Yield: 25 servings
- Category: Entree
- Method: Stir
- Cuisine: American
Ingredients
- 4 lbs. ground pork
- 2 lb. ground beef
- 4 oz. Pepperoni Seasoning*
- 0.25 oz. cure (comes with the seasoning)*
- 3/4 cup water, plus more as needed
- 1–3 drops liquid smoke (optional)
- 2–3 tsp. crushed red pepper flakes (optional)
Instructions
- Place meat in a mixing bowl.
- Add pepperoni seasoning and mix.
- Dissolve cure in ¾ cup water. Add liquid smoke and red pepper flakes to water as well, if using.
- Add cure mixture to meat.
- Mix by hand, adding more water 1 teaspoon at a time, until the mixture is sticky enough to stick to inverted hand.
- Place the mixture into a sausage stuffer (like this one or this one) and stuff into casings following the sausage stuffer’s instructions. Or, follow the instructions above or here for making sausage without special equipment. You’ll want to make your cylindrical meat shapes about 1 and ½ inch in diameter and about 12 inches long.
- Refrigerate the sausages (whether in casings or in plastic wrap+foil) in a single layer for 24 hours to allow the cure to properly penetrate and for the shape of the sausage to set.
- Preheat oven to 325°F.
- Carefully remove foil and plastic wrap from tubes of meat if you used them instead of casings. Carefully lay the cylinders of meat, or your casings stuffed with meat, on an oven-safe rack placed over a baking sheet.
- Put into the oven and bake until meat reached an internal temperature of 160°F on an instant read thermometer (like this), 45-60 minutes.
- Take out of oven and let cool.
- Slice and enjoy.
Love this recipe? I’d appreciate it if you could scroll down and add a *5 star rating* to help others know they’ll love it as well!
Notes
*If you want to make your own homemade pepperoni seasoning, you’ll find information about that above the recipe. As to store-bought pepperoni seasoning, note that all pepperoni seasoning and all cure are the same. For instance, some pepperoni seasoning already contains cure. The amounts given above are for the product that we have recommended. It is a packet of pepperoni seasoning that comes with a packet of cure. If you have different brands, please read the instructions on yours to see how much to add per pound of meat. Also, check your pepperoni seasoning to see if it contains cure already. If it has sodium nitrate in it, and if the instructions for its use don’t say to add cure, it probably contains cure. For instance, this alternate pepperoni seasoning already contains cure, and the amount to use listed on the instructions is different to the amounts in our recipe. Please read the instructions on your packets of seasoning and cure to make sure that you end up with a flavorful and properly cured sausage.
The post Homemade Pepperoni appeared first on The Cookful.